Getting started with the Wago PFC100 750-8102
The PFC100 basically is an ARM powered embedded linux single-board-computer (cough Raspberry Pi cough), but for grown-ups and with the attributes you expect from industrial automation equipment:
- All the certifications you can dream up.
- DIN rail mounting
- Running from 24V DC
- Beautifully extendable I/O concept (just slide some of the 750-series I/O modules <http://www.wago.de/produkte/produktkatalog/automatisierungskomponenten/modulares-wago-io-system-ip20-serie-750-753/uebersicht/index.jsp> onto the PFC)
- Extensive, well-written documentation <http://www.wago.mx/download.esm?file=download00375223_0.pdf&name=m07508102_xxxxxxxx_0_en.pdf>
- Built-in ethernet switch so you can daisy-chain devices or use for two independant network segments
- A development mentality inherited from the classic industrial automation developer
- No wifi onboard
- Mediocre specs on the CPU side
People using it with CODESYS will feel right at home. If you know what CODESYS is, this text might very well not be for you. The device is obviously a real PLC for serious business.
Then again, I look at it from the other side: An ARM computer with excellent I/O options and not even that expensive. How to use that for interfacing some industrial equipment (say counting on a digital input) with, say, an ERP system?
Unboxing and initial setup
To do everything the right way, get yourself a grounded 35mm DIN rail (20cm should be enough), put a 24V powersupply next to the PFC and wire it up like this:

After powering up and showing all kinds of LED action, it should settle on steady green SYS and I/O and RUN blinking green at ~1Hz within the first minute.
If you connect X1 to a typical LAN (Ethernet, DHCP available), the PFC will present itself as a host named PFC-100-12AB00, where the last six characters match the last six of the interface MAC address.
Network security footprint
Portscanning will show you open 22/tcp, 80/tcp, 443/tcp, 514/udp and 502/udp, in other words SSH, HTTP, HTTPS, Syslog and something I don't know are reachable. Since the PFC ships with default passwords (HTTP(s): admin/wago, user/user, guest/-; SSH: root/wago, admin/wago, user/user), doing the first connection on a trusted LAN with no roque nodes is necessary.
PORT    STATE SERVICE  VERSION
22/tcp  open  ssh      Dropbear sshd 2015.67 (protocol 2.0)
80/tcp  open  http     lighttpd
443/tcp open  ssl/http lighttpd
MAC Address: 00:30:DE:xx:xx:xx (Wago Kontakttechnik Gmbh)
...
Service Info: OS: Linux; CPE: cpe:/o:linux:linux_kernel
The TLS certificate presented on my unit is obviously self-signed (on 2013-05-10) using RSA with a 1024bit modulus and SHA-1, which is better than delivering no HTTPS endpoint, I guess.
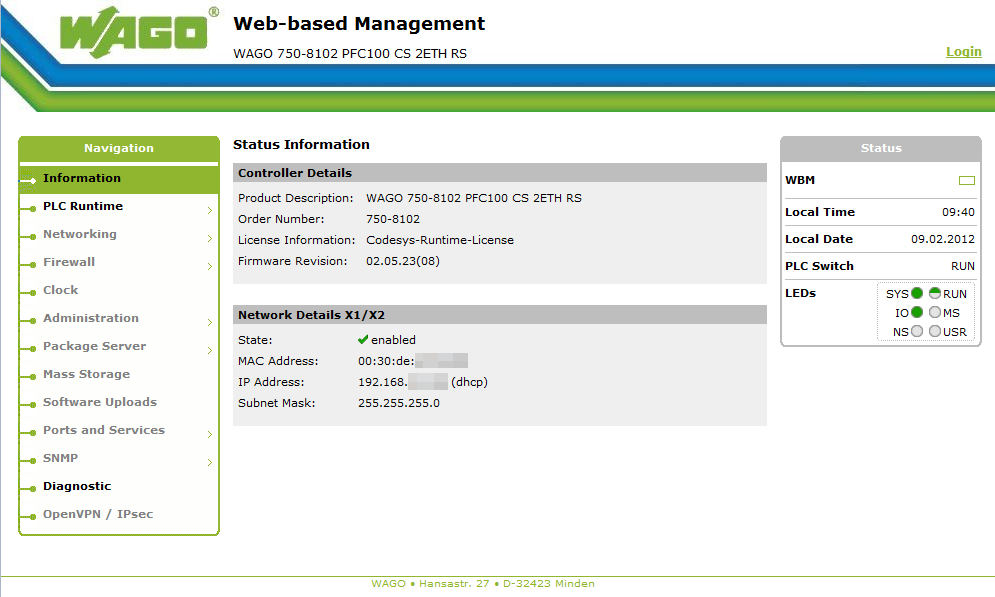
The HTTP(S) endpoint reveals a nice management UI that reveals a Firmware Revision of 02.05.23(08) and that the clock is not set automatically:
The Dropbear SSH server might have at least one CVE<https://web.nvd.nist.gov/view/vuln/search-results?query=dropbear&search_type=all&cves=on> in it which is not too critical in this situation.
Upon first login as root, you are instructed to change the root password. That's a nice touch and you can bypass it with Ctrl+C.
Initial impressions
The "Web-based Management" is a comprehensive way to administer the device. You find it by pointing your webbrowser to the IP of the PFC device.
Internal Flash
The firmware by default resides on the Internal Flash memory, which is partitioned into an active and an inactive root partition (rootfs0 and rootfs1) and two partitions home and boot:
root@PFC100-xxxxxx:/ ubinfo  -a
UBI version:                    1
Count of UBI devices:           1
UBI control device major/minor: 10:58
Present UBI devices:            ubi0

ubi0
Volumes count:                           4
Logical eraseblock size:                 129024 bytes, 126.0 KiB
Total amount of logical eraseblocks:     2028 (261660672 bytes, 249.5 MiB)
Amount of available logical eraseblocks: 0 (0 bytes)
Maximum count of volumes                 128
Count of bad physical eraseblocks:       0
Count of reserved physical eraseblocks:  40
Current maximum erase counter value:     1
Minimum input/output unit size:          2048 bytes
Character device major/minor:            245:0
Present volumes:                         0, 1, 2, 3

Volume ID:   0 (on ubi0)
Type:        dynamic
Alignment:   1
Size:        556 LEBs (71737344 bytes, 68.4 MiB)
State:       OK
Name:        rootfs0
Character device major/minor: 245:1
-----------------------------------
Volume ID:   1 (on ubi0)
Type:        dynamic
Alignment:   1
Size:        556 LEBs (71737344 bytes, 68.4 MiB)
State:       OK
Name:        rootfs1
Character device major/minor: 245:2
-----------------------------------
Volume ID:   2 (on ubi0)
Type:        dynamic
Alignment:   1
Size:        522 LEBs (67350528 bytes, 64.2 MiB)
State:       OK
Name:        home
Character device major/minor: 245:3
-----------------------------------
Volume ID:   3 (on ubi0)
Type:        dynamic
Alignment:   1
Size:        348 LEBs (44900352 bytes, 42.8 MiB)
State:       OK
Name:        boot
Character device major/minor: 245:4
The partitioning is part of UBIFS<https://en.wikipedia.org/wiki/UBIFS>
Copying the running system to a bootable image
- You can copy the running system (that by default starts from a
- filesystem in the Internal Flash memory)
to an SD card that you plugin into the slot:

This repartitions the SD card to start with a 64 MiByte FAT partition followed by small (if you chose Reduced to content for Size of created image) partition containing the root partition as an EXT3 filesystem. In case you choose Full card size, the EXT3 partition will span the rest of the SD card.
Firmware backup
It is unclear to me what exactly a firmware backup is, but you can do it and the result are files on the first partition of the SD card.
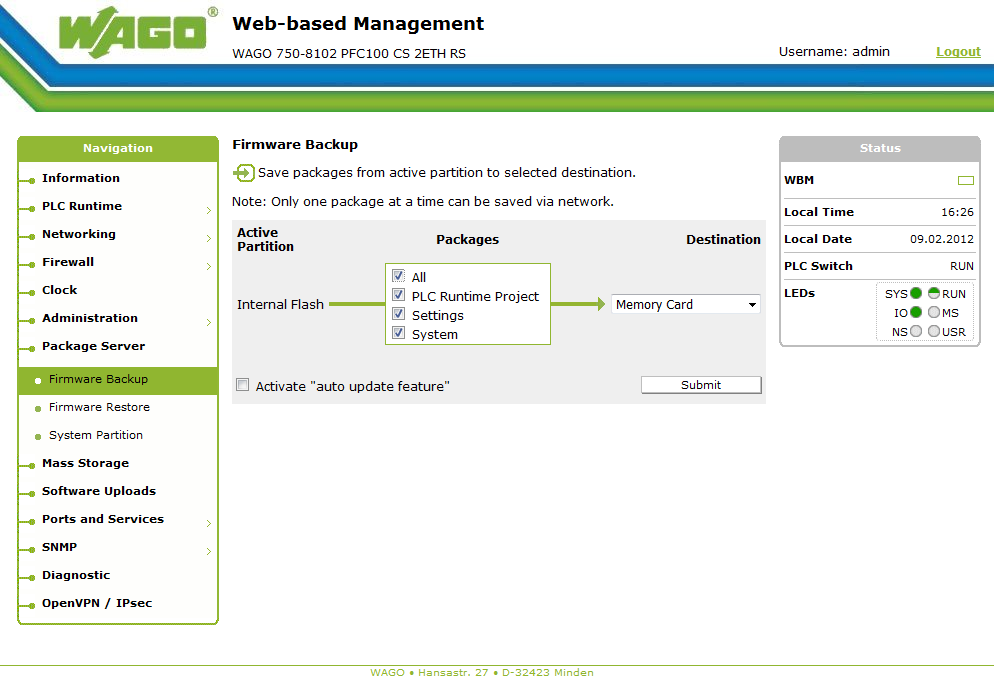
Note that you will see an unhelpful Internal error if that partition is full. So if you made a bootable image as mentioned above, this will likely fail and clutter the filesystem.
Serial console and USB connector
Behind a small hinged door is a service interface for which WAGO sells a USB connector for. Electrically, this is a 5V "TTL-style" serial port with this pinout when listed from top to bottom:
- TxD
- RxD
- 5V
- GND
So if you have a simple "USB-to-TTL-Serialport" cable, you have all you need.
The genuine WAGO Service cable contains a Silicon Labs CP201x USB-UART-bridge but with USB VID:PID 1BE3:07A6. If you don't fancy too many drivers and already have one, the generic Silicon Labs CP201x USB to UART bridge <http://www.silabs.com/products/development-tools/software/usb-to-uart-bridge-vcp-drivers> works just fine. Default parameters are 115200,8,N,1 as usual.
The serial console on the service interface connector is by default not used by the kernel but for Wago's Service Communication. You can change that in Administration -> Service Interface to Linux Console.
That does not show the boot process though.
Getting Docker running
The problems with containers can be discussed, especially if you think of the PFC as a PLC, but for software development and deployment, it can be very useful.
The steps to Docker:
- Run a kernel with needed modules (check via check-docker.sh).
- Present a proper /sys/fs/cgroup hierarchy (setup using cgroupfs-mount)
- Install docker client and daemon for ARM (cross-compiled from elsewhere)
- Provide correct time (ntpclient -s -h pool.ntp.org) and a /etc/ssl/certs/ca-certificates.crt bundle to allow validation of the public repository.
- Provide space for layer storage.
- Run daemon. dockerd-17.04.0-dev -D --graph /large/dmstore
- Use client. docker pull armv7/armhf-baseimage
xxxxxx
Universal Robots' UR3/UR5/UR10, Baxter and Sawyer from Rethink Robotics and others like Kuka's LBR series.
These won't ever assemble the heavy parts of your car, but they have some distinct properties:
- Cheap: Dirt cheap if you think in industrial automation dimension. UR10 comes in a box for less than 30.000€. That is 3-5 times cheaper than typical installations have been ~5-10 years ago.
- Compliant: Means safe to work in proximity to humans without a cage in most cases. It basically brings common sense safety into the domain: You can (and will) build applications that inherently won't be able to seriously harm operators, co-workers or equipment.
- Easy (or easier) to setup, program and operate: It seems reasonable to have normal production staff at least operate the robot and reset error conditions. Staff who don't mind learning very basic graphical programming (think Basic without arithmetics) should also be able to write/enter programs. I can't see anyone demanding 6-figure wages for programming those robots. Sorry.
- Complete solution in a box: You get a robot, a programming/operating console, all the software (on that console) and licenses with the robot. There are no needed external components and no mandatory integration work to be done.
- Limited: Payload for the UR10 is 10kg. Range is 1300mm max.
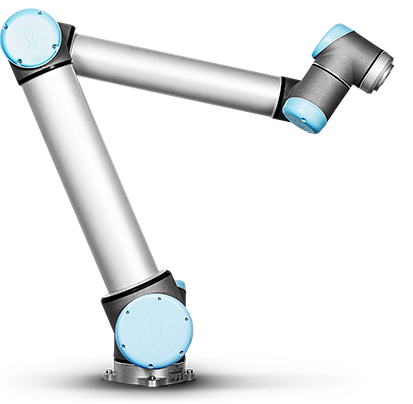
This is what the 10kg-payload UR10 looks like:
One of the questions that arise once you think about automating a production step with one of these is: Where can I put it and how far can it reach. Traditionally, your service provider would do that analysis. But with the cheap people entering the market, customers will want to do that themselves. I am one of those customers who value being able to do (or at least check) such an analysis themselves.
And astonishingly, you can do it rather easily - with free tools (as in free beer)!
Onshape is a CAD workbench that works in your webbrowser. And it works quite well for stuff like this! If you get an Onshape account, you can access my document UR10 reachability analysis:
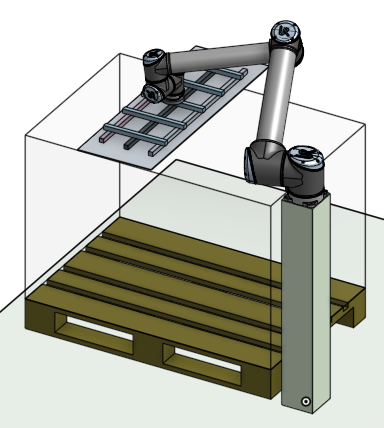
Once you create a copy of that document, you can select parts attached to the tool of the robot and move it. Onshape interactively calculates the kinematic to move the robot joints. The way the model is setup, you should not be able to move the tool beyond the reachability of the robot. But - no guarantees!
The actual robot 3D model was taken from the UR10 product page. The joints that link and constraint the parts were added in Onshape.
Have fun playing with the robot - without having the robot!